It is no more difficult than any other cut out cookie but shhhhhh don't tell anyone.......
It's time, once again, for Baking Bloggers led by my friend Sue of Palatable Pastime. Sue asked us to embrace the winter season by baking up snow topped recipes.
Let's see what everyone is bringing to the party this month......
Baking Bloggers
Snow
Winter means snow- with snowflakes both outside and in our kitchens!
- Billowy Gingerbread Trifles from Culinary Adventures with Camilla
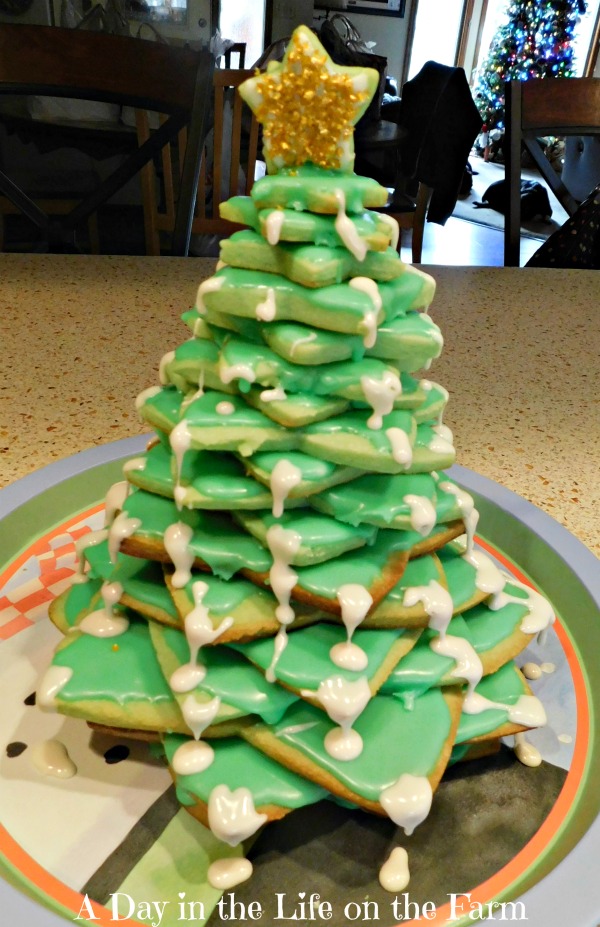
- Christmas Cookie Tree from A Day in the Life on the Farm
- Grandma's Meringue Cookies from Our Good Life
- Kourabiedes Greek Cookies With Powdered Sugar from Recipe Pocket
- Mexican Wedding Cookies from The Schizo Chef
- Snow Ball Cupcakes from Karen's Kitchen Stories
- Snowy Mountain Cookies from Jolene's Recipe Journal
- Sweet Buttermilk Pie from Food Lust People Love
- White Texas Sheet Cake from Making Miracles
- Winter Wonderland Cake from Sid's Sea Palm Cooking
What a fun bunch of titles. I can't wait to go check them all out there are still lots and lots of baking days left this Holiday Season.

When my dear friend Linda was packing to move to Arizona she found this set of cookie cutters and passed them along to me. I put them up in my cupboard and had actually forgotten all about them until I was rummaging in my baking cupboard looking for something else.
Included with the cookie cutters were directions for several different types of Cookie Trees. Since we were celebrating snow today, I decided to make the snow-capped cookie tree. With some slight adaptations, of course.

This cookies are just a basic cut out cookie dough. You can use the recipe I'm sharing or your favorite recipe. The recipe below is a butter cookie with almond flavoring. Once the cookies are cut and baked, let them cool completely.
I was very pleased with the ease of spreadability in the icing recipe provided by Wilton Company, but it made much more icing than I needed. I will halve the recipe the next time I make it.

There was more cookie dough than needed as well, so I rolled and cut it into different shapes. I could have used some of the extra icing on them but they seemed to disappear between the time they were cooling and the following day when I was frosting.

Once the cookies are frosted let them set for at least an hour for the icing to harden. The assembly itself doesn't take long at all. Just place a dab of icing into the center of each cookie and place them on top of each other starting with the largest and working to the smallest, staggering the points.

I saved one of the small stars to top the tree, using white icing and edible gold glitter. I had tinted all of my icing green. The directions suggest using buttercream frosting to make the snow. I picked up a pouch of ready made cookie icing and called it a day. I was so pleased with how well it turned out.

Christmas Cookie Tree
Wow your family and friends by setting out this gorgeous to look at and fun to make Christmas Tree constructed of star shaped Almond Butter Cookies.
ingredients:
Cookies
- 2 c. butter, room temperature
- 2 c. sugar
- 2 eggs
- 4 t. baking powder
- 2 t. almond extract
- 6 c. flour
- green food coloring
Icing
- 9 c. powdered sugar, sifted
- 3/4 c. water
- 3 T. corn syrup
- 1 1/2 t. almond extract
- green food coloring
Assembly
- 1 pouch white cookie icing
- edible gold glitter
instructions:
How to cook Christmas Cookie Tree
Cookies
- In large bowl of stand mixer, fitted with the paddle attachment, cream together the butter and sugar. Beat in the eggs and vanilla.
- With the speed on low, add the baking powder and flour, 1 cup at a time until incorporated. When all of the flour is mixed in add drops of food coloring until you reach the desired shade of green.
- Take a portion of dough and roll to a thickness of 1/4 ". Cut out 2 of each size star, adding more dough to the scraps and rolling out as needed.
- Place stars onto baking sheets lined with parchment or silicone mats and bake until the edges are light brown. This will take about 10-12 minutes for larger stars and 5-7 minutes for smaller stars.
- Remove to wire racks and let cool completely.
Icing
- Place the sugar, water and corn syrup into a large pan over low heat. Cook and stir until melted and smooth. Remove from heat. Stir in almond extract and drops of food coloring until the icing is the desired hue.
- Place the wire racks holding the cookies over a baking sheet lined with parchment. Using a small scoop or measuring cup pour some icing into the center of a star and spread to the edges with a knife. Continue until all stars are frosted except for one of the smallest stars.
- Frost this small star with some of the white cookie icing and sprinkle with edible gold glitter.
- Let cookies dry completely for at least one hour before assembly.
Assembly
- Place one of the largest stars onto a platter. Add a small dollop of icing to the center and place the matching size star on top, alternating points. Continue in this manner working upwards with each size of star until you get to the final golden star.
- Add a dollop of icing onto the top of the tree and set the the golden star vertically on top, holding for a few seconds to allow it to set.
- Using a fine tip on the pouch of white icing, place a generous amount of icing on each point allowing it to drip and harden into the appearance of snow.
NOTES:
Recipes adapted from Wilton.
.
Property of A Day in the Life on the Farm
I have a set of these cutters, need to pull them out and make this with my niece, so fun!
ReplyDeleteShe will love making this tree Jolene.
DeleteI've toyed with the idea of making these, but have held off, this may be the year for it.
ReplyDeleteIt takes a little time but is very simple and the results are well worth the time.
DeleteSUCH a cute idea!! My daughter would love to assemble a cookie tree like this!
ReplyDeleteI'm sure she would love it Rebekah.
DeleteI have always wanted to make one of these. I guess I need to break down and buy the cookie cutters!
ReplyDeleteI am toying with the idea of making small individual trees using only the smallest 3 or 4 sizes of stars.
DeleteOMG - what an artistic creation. I love having nested cookie cutters so you can create unique creations - just like this one!
ReplyDeleteLooks so wonderful and is not at all difficult. My kind of recipe.
Delete